
Losing your iPhone can be a devastating experience, but losing your precious data can be even worse. Photos, contacts, messages, and more—it’s all invaluable. That’s why creating a robust and reliable iPhone backup is absolutely essential. This Ultimate iPhone Backup Guide will provide you with a comprehensive understanding of the various backup methods available, outlining the advantages and disadvantages of each, empowering you to make the best decision for your individual needs. Whether you’re a seasoned iPhone user or just starting out, learning how to effectively backup your iPhone will give you peace of mind, knowing your data is safe and sound.
This guide will explore two primary iPhone backup methods: backing up to iCloud and backing up to a computer using Finder (for macOS Catalina and later) or iTunes (for earlier macOS versions and Windows). We will delve into the specifics of each method, offering step-by-step instructions and highlighting best practices. We’ll also discuss encrypted backups for enhanced security, and address common troubleshooting issues. By the end of this guide, you’ll be equipped with the knowledge to confidently backup your iPhone and ensure your valuable data is protected against loss or damage.
Understanding Backup Options: iCloud vs. Computer
Choosing the right backup method depends on your needs and available resources. There are two primary ways to back up your iPhone: iCloud and your computer.
iCloud Backup
iCloud offers a seamless, automatic backup solution. It utilizes your iCloud storage space and requires an internet connection. This option is ideal for those seeking convenience and automatic backups without needing a computer.
Computer Backup (Finder or iTunes)
Backing up to your computer offers more control and often faster backup and restore speeds. It uses your computer’s storage and doesn’t depend on internet speed. This method is best for those with limited iCloud storage or those who prefer local backups.
The following table summarizes the key differences:
| Feature | iCloud | Computer |
|---|---|---|
| Automation | Automatic | Manual |
| Storage Location | iCloud Storage | Computer’s Hard Drive |
| Internet Required | Yes | No (for backup/restore) |
Backing Up to iCloud: A Step-by-Step Guide
Backing up your iPhone to iCloud is a convenient way to safeguard your data wirelessly. Ensure you have enough iCloud storage available. You can manage your storage in the iCloud settings.
Step 1: Connect to Wi-Fi. A stable Wi-Fi connection is crucial for iCloud backups.
Step 2: Open Settings. Locate and tap the “Settings” app on your iPhone’s home screen.
Step 3: Tap your Apple ID banner. This is located at the top of the Settings screen.
Step 4: Select iCloud.
Step 5: Choose iCloud Backup.
Step 6: Toggle on iCloud Backup. If it’s not already enabled, tap the slider to activate iCloud Backup.
Step 7: Tap Back Up Now. This will initiate an immediate backup of your iPhone to iCloud. The time required will depend on the amount of data being backed up and your internet speed.
Backing Up to Your Computer via Finder or iTunes
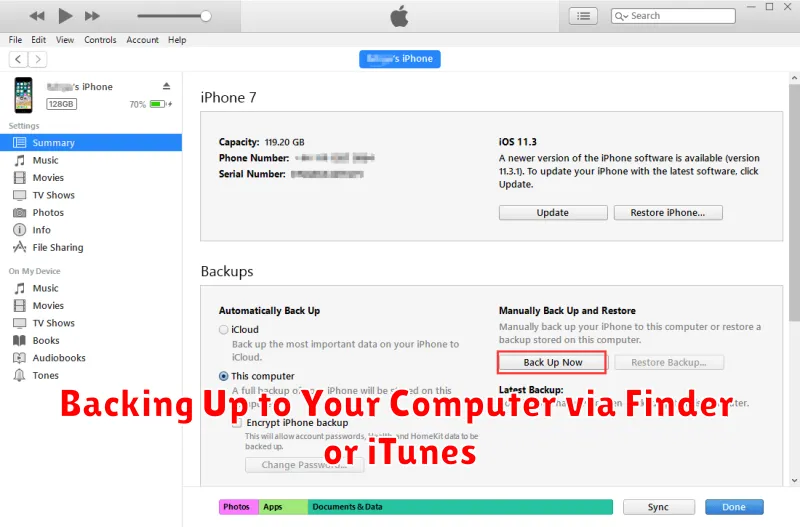
Backing up your iPhone to your computer offers a fast and secure alternative to iCloud, especially beneficial for users with limited internet bandwidth or large storage needs. The method you use depends on your computer’s operating system.
macOS Catalina and Later (Finder)
Connect your iPhone to your Mac. Open a Finder window and locate your iPhone in the sidebar. Select the “General” tab. Under the “Backups” section, choose “Back up all of the data on your iPhone to this Mac.” Click “Back Up Now.” You can also encrypt your backup for added security by selecting “Encrypt local backup.”
macOS Mojave and Earlier or Windows (iTunes)
Connect your iPhone to your computer. Open iTunes. Click the device icon that appears near the top left of the iTunes window. In the Summary tab, under “Backups,” select “This computer.” Click “Back Up Now.” Encrypting your backup is also available with the “Encrypt local backup” option.
What Data is Backed Up?
Understanding what data is included in your iPhone backup is crucial. Both iCloud and computer backups save a majority of your important information, allowing you to restore your device to a near-identical state.
Key data included in backups:
- App data (for many apps)
- Apple Watch backups
- Device settings
- Home screen and app organization
- iMessage, text (SMS), and MMS messages
- Media (photos, music, videos, etc. – depending on settings)
- Network settings
- Passcode (but not Touch ID or Face ID settings)
- Purchase history from Apple services (apps, music, movies, etc.)
- Ringtones
- Visual Voicemail password (requires the same carrier after restore)
Data not included:
- Apple Pay information and settings
- Content from iCloud Photos if you use that feature (iCloud Photos keeps your photos and videos in sync with iCloud separately)
- Face ID or Touch ID settings
- iCloud data already stored in iCloud, like contacts, calendars, notes (synced separately)
- Keychain data (passwords and other sensitive info – usually synced through iCloud Keychain)
Restoring Your iPhone from a Backup
Restoring your iPhone returns it to a previous state using a backup you’ve created. This process can be crucial after data loss, replacing a broken device, or setting up a new iPhone.
Restoring from iCloud
To restore from an iCloud backup, you’ll need to erase your iPhone first. During the setup process, choose the option to restore from an iCloud Backup and select your preferred backup. Ensure a stable Wi-Fi connection as this process may take time depending on the backup size.
Restoring from a Computer
Connect your iPhone to the computer you used for backups. Open Finder (macOS Catalina or later) or iTunes (earlier macOS versions or Windows). Locate your iPhone and select the “Restore Backup” option. Choose the desired backup from the available list and wait for the process to complete. Do not disconnect your iPhone until the restoration process is finished.
Important: After restoring, your iPhone will restart and display the progress of loading your data. The time required depends on the size of the backup.
Troubleshooting Backup Issues
Encountering problems backing up your iPhone? Here are some common issues and how to resolve them:
Insufficient Storage
Check storage: If your iCloud or computer storage is full, you won’t be able to back up. Free up space by deleting unnecessary files or upgrading your storage plan.
Connection Issues
Verify connection: Ensure your iPhone has a stable Wi-Fi connection for iCloud backups or that it’s correctly connected to your computer for iTunes/Finder backups. Restart devices: Restarting your iPhone and computer can often resolve connection problems.
Unknown Error Messages
Update software: Make sure both your iPhone and your computer have the latest software updates. Try another cable/port: If using a wired connection, try a different USB cable or port on your computer. Restart iTunes/Finder: Close and reopen iTunes or Finder.
Backup Corruption
Try another backup method: Attempt an iCloud backup if using iTunes/Finder or vice-versa. Contact Apple support: For persistent issues, contact Apple support for further assistance.
Best Practices for iPhone Backup
Implementing best practices ensures a smooth and reliable backup process. Regular backups are paramount. Consider weekly backups if you change data frequently, or monthly for less frequent changes.
Strong Wi-Fi is crucial for iCloud backups. A stable connection prevents interruptions and speeds up the process. Ensure sufficient iCloud storage. Regularly check your available space and upgrade if necessary to avoid backup failures.
Organize your data before backing up. Deleting unnecessary apps, photos, and videos will streamline the backup and save storage space. Verify your backups. After each backup, take a moment to confirm its completion and integrity.
Automating Your Backups
Regular backups are crucial, and automating the process ensures your data is consistently protected without manual effort. iCloud and iTunes/Finder offer automated backup solutions.
iCloud Automatic Backups
iCloud offers a seamless automatic backup solution when your iPhone is connected to Wi-Fi, plugged into power, and locked. Enable this feature in Settings > [your name] > iCloud > iCloud Backup. Ensure sufficient iCloud storage is available for a complete backup.
iTunes/Finder Automatic Backups
When you connect your iPhone to your computer, iTunes (on Windows and older macOS versions) or Finder (on newer macOS versions) can automatically create backups. While not as frequent as iCloud, this method is useful for creating local, encrypted backups. Check the “Automatically Back Up” option in your device’s summary panel within iTunes/Finder.