
Have you updated your Android OS only to find it riddled with bugs, experiencing decreased performance, or missing beloved features? Downgrading your Android version can be a viable solution to restore functionality and reclaim a preferred user experience. This comprehensive guide will walk you through the process of how to downgrade your Android version step by step, addressing potential pitfalls and offering practical advice for a successful reversion.
While downgrading an Android version isn’t officially supported by all manufacturers, it’s often achievable with some technical know-how. This guide explains the necessary precautions, like backing up your data, understanding the risks involved, and selecting the correct Android version for your device. We will cover methods for various manufacturers, addressing common issues and highlighting essential steps for a smooth downgrade. Whether you’re experiencing performance issues, compatibility problems, or simply prefer an older Android version, this guide equips you with the knowledge to confidently navigate the downgrading process.
Backing Up Your Data Before Downgrading
Downgrading your Android version will erase all data on your device. Therefore, creating a backup is crucial before proceeding. This ensures you can restore your important information after the downgrade is complete.
There are several ways to back up your data:
- Google Account Sync: Most Android devices offer automatic backups to your Google account. Check your settings to ensure contacts, calendar events, and app data are being synced.
- Built-in Backup Features: Some manufacturers provide their own backup solutions. Consult your device’s manual for specific instructions.
- Third-party Backup Apps: Numerous apps on the Google Play Store offer comprehensive backup functionality.
- Manual Backup to Computer: You can manually transfer important files like photos, videos, and documents to your computer.
Choose the method that best suits your needs and ensure you have a complete backup before continuing to the next step.
Unlocking Your Android Device’s Bootloader
Unlocking your bootloader is a crucial step before downgrading your Android version. It allows you to install custom software, including older Android builds. Be aware that this process will completely erase your device’s data, so backing up beforehand is essential.
The process for unlocking the bootloader varies significantly depending on the device manufacturer. Some manufacturers provide official unlocking tools and instructions, while others require more complex methods.
Generally, you’ll need to enable Developer Options and USB Debugging in your device’s settings. Then, connect your device to your computer and use the appropriate command-line tools (often provided by the manufacturer) to initiate the unlocking process.
Consult your device manufacturer’s website or online forums for device-specific instructions on how to unlock the bootloader. This is a vital step, and incorrect procedures can potentially damage your device.
Downloading the Correct Factory Image for Your Device
Downloading the correct factory image is crucial for a successful downgrade. Using the wrong image can brick your device, rendering it unusable. Therefore, exercise caution and double-check compatibility before proceeding.
Factory images are typically provided by your device’s manufacturer. Locate the support section of their website and search for your specific device model. Look for downloads labeled “factory image,” “stock ROM,” or similar terminology.
Pay close attention to the listed build number and ensure it corresponds to the Android version you intend to downgrade to. Downloading the wrong version will result in an unsuccessful downgrade.
Once you’ve located the correct factory image, download it to your computer. Keep the file in an easily accessible location as you’ll need it later during the downgrade process. Remember to verify the file integrity after downloading to ensure it hasn’t been corrupted during the transfer.
Installing the Android SDK Platform Tools
The Android SDK Platform Tools are essential for interacting with your Android device at a lower level, which is necessary for downgrading the OS. These tools include ADB (Android Debug Bridge) and fastboot.
You can download the standalone SDK Platform-Tools package directly from the official Android developer website. Ensure you select the correct package for your operating system (Windows, macOS, or Linux).
Once downloaded, extract the ZIP file to an easily accessible location on your computer. Make a note of this location as you’ll need to access it from the command line later in the process. Adding the platform-tools directory to your system’s PATH environment variable will simplify using the tools. This allows you to execute ADB and fastboot commands from any directory in your command prompt or terminal.
After extraction, verify the installation by opening a command prompt or terminal and typing adb version. If the installation was successful, the system will display the ADB version information. Similarly, typing fastboot --version will show the fastboot version, confirming its proper installation.
Connecting Your Device to Your Computer and Entering Fastboot Mode
First, ensure you have the necessary USB cable to connect your Android device to your computer. Ideally, use the cable that came with your device for optimal connection. Once connected, you’ll need to enable USB debugging on your Android device.
The process for enabling USB debugging varies slightly between Android versions, but generally involves going to Settings > About Phone > Software Information and tapping the Build Number several times until Developer Options are enabled. Then, return to Settings > System > Developer options (location may vary) and enable USB Debugging.
Next, you’ll need to put your device into Fastboot Mode. This also varies between devices, but often involves holding a combination of the power and volume down buttons while the device is powered off. Consult your device’s specific instructions for the exact button combination. Once in Fastboot Mode, your device’s screen will typically display a “Fastboot” indicator.
Flashing the Factory Image to Downgrade Your Android Version
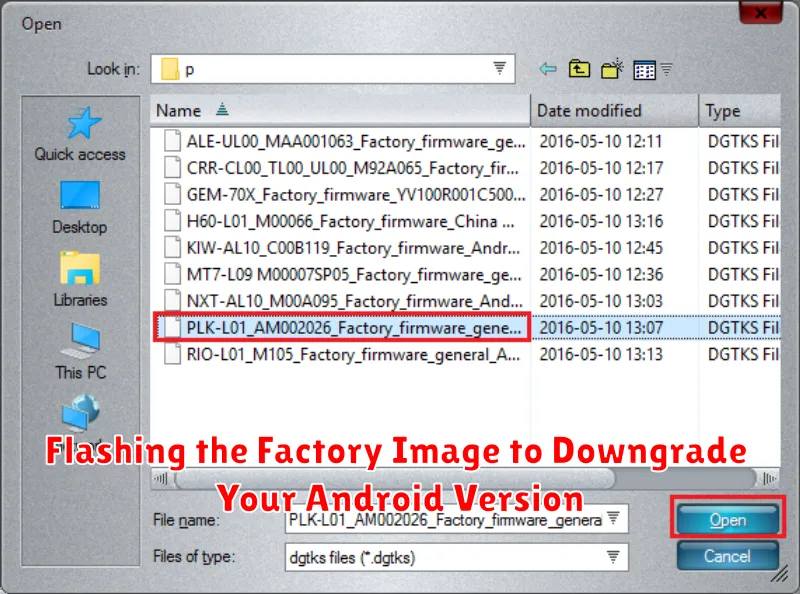
This process involves replacing your current Android system with an older factory image. Be aware that this will erase all data on your device, so backing up important files beforehand is crucial.
First, download the correct factory image for your specific device model and the desired Android version. Ensure you obtain this from a reliable source, such as the official manufacturer’s website. Incorrect images can brick your device.
Next, you’ll need to unlock your device’s bootloader. The process varies depending on the manufacturer, so consult your device’s documentation for specific instructions. After unlocking, enable USB debugging in your device’s developer options.
Install the necessary tools, typically including platform-tools from the Android SDK. Then, connect your device to your computer and boot it into fastboot mode. The method for entering fastboot also varies by device.
Finally, flash the factory image using the appropriate commands in your computer’s terminal or command prompt. Refer to the factory image’s instructions for the exact commands, as they may vary.
Verifying the Downgrade and Restoring Your Data
After the flashing process completes, your device should reboot automatically. Once it’s back on, it’s crucial to verify the downgrade was successful. Navigate to your device’s settings and look for the “About Phone” or “Software Information” section. Here, you should see the Android version number reflecting the version you intended to install.
Restoring your data is the next step. If you created a backup before the downgrade process, you can now restore it. The exact restoration method depends on the backup method you used. Most Android devices offer built-in backup and restore functionality accessible through the settings menu. Alternatively, you might be using third-party backup solutions or cloud services.
Important Note: Restoring a backup from a newer Android version onto a downgraded version might cause compatibility issues. It’s advisable to selectively restore only essential data, like contacts and photos, rather than the entire system backup. This minimizes the risk of encountering problems.
Troubleshooting Common Downgrading Issues
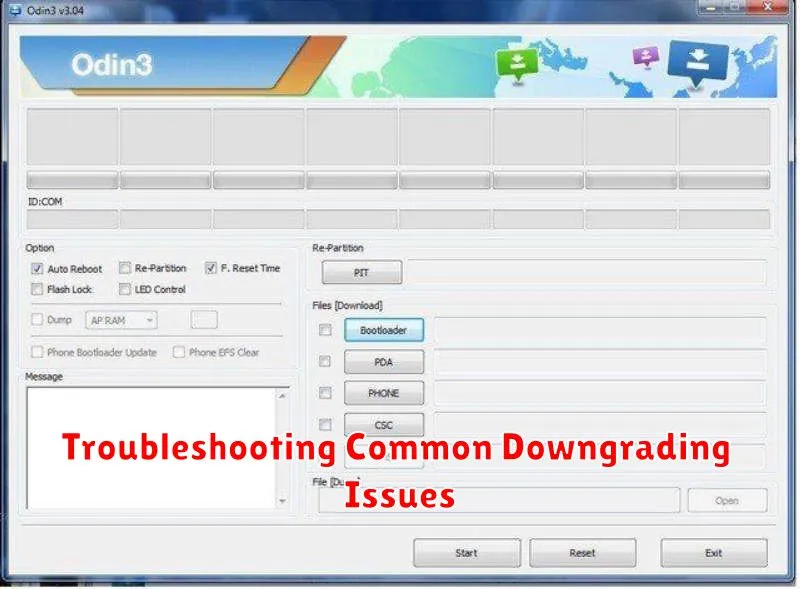
Downgrading your Android version can sometimes encounter issues. Here are some common problems and potential solutions:
Device Not Recognized by Computer
Ensure proper drivers are installed. Check your device manufacturer’s website for specific USB drivers. Try different USB ports and cables. A faulty cable or port can prevent connection. Enable USB debugging mode in your device’s developer options.
Flashing Process Fails
Verify the downloaded factory image integrity. Corrupted files can lead to flashing errors. Confirm compatibility of the factory image with your specific device model. Ensure sufficient battery charge on your device before starting the process. A low battery can interrupt the flashing process.
Bootloop After Downgrade
Try clearing the cache partition through the recovery mode. This can often resolve bootloop issues. If the problem persists, reflash the factory image, ensuring you have the correct version.