
Developer Options offer a treasure trove of advanced settings and customizations hidden within Android devices. This comprehensive guide will unlock the secrets of Developer Options, providing you with step-by-step instructions on how to access these powerful tools. Whether you are a seasoned developer looking to debug your applications or an enthusiastic user wanting to explore hidden features, this guide will empower you to harness the full potential of your Android device. Understanding Developer Options can significantly enhance your overall Android experience.
From enabling USB debugging for seamless app development to tweaking animation speeds for a more responsive interface, this guide will delve into the intricacies of each setting. Learn how to enable Developer Options, explore the various configurations available, and understand their practical applications. Whether you aim to improve performance, customize animations, or access advanced diagnostic tools, this comprehensive guide will equip you with the knowledge and understanding necessary to unlock the true power of Developer Options.
What are Developer Options?
Developer options are a hidden menu within Android and iOS operating systems that provide advanced system settings and tools. These settings are intended for software developers to test and debug applications and system functionalities. They offer granular control over various aspects of the device, including USB debugging, animation speeds, background process limits, and more.
By default, these options are hidden to prevent accidental modification by average users, as changes to these settings could potentially affect device performance and stability. However, they can be easily unlocked through a specific sequence of steps within the device’s settings menu.
While primarily designed for developers, these options can also be utilized by tech-savvy users to customize their device experience. For instance, users might tweak animation speeds for a perceived performance boost, or enable USB debugging to interact with their device through a computer.
Steps to Enable Developer Options on Android
Enabling Developer Options on Android involves a few simple steps, primarily focused on the “About Phone” section in your device’s settings. The exact navigation might vary slightly based on your Android version and manufacturer’s customization, but the general process remains consistent.
First, open the Settings app. Then, scroll down and tap on About Phone or About Device. Locate the Build Number. Tap on the Build Number repeatedly, usually seven times. You’ll see a toast message counting down the remaining taps until Developer Options are enabled.
Once you’ve tapped enough times, a message will appear confirming that “You are now a developer!” Return to the main Settings menu. You should now see Developer Options listed, typically near the bottom or under a “System” category.
Steps to Enable Developer Options on iOS

Enabling Developer Options on iOS requires Xcode, Apple’s Integrated Development Environment (IDE), and a Mac computer. Unlike Android, these options aren’t accessed directly through the device settings.
First, ensure you have the latest version of Xcode installed on your Mac. Then, connect your iOS device to your Mac using a USB cable.
Next, open Xcode and navigate to the “Window” menu. Select “Devices and Simulators”.
Locate your connected iOS device in the left-hand panel. A details pane will appear on the right. Within this pane, you’ll find various device information.
Finally, enabling developer mode involves activities within Xcode’s project settings, particularly when configuring build and debugging options related to your connected device.
Common Uses for Developer Options
Developer options offer a range of functionalities for improving app development, performance tuning, and customizing the user experience. Here are some common uses:
Debugging and Testing
USB debugging allows connecting your device to a computer for debugging apps. Show touches visually displays touch input, aiding in UI testing. Layout bounds reveals the boundaries of elements on screen, helpful for UI design and debugging.
Performance Tuning
Adjusting animation scales can speed up or slow down animations for a customized feel. Limiting background processes can free up system resources and improve performance. GPU rendering profiling displays graphics rendering performance, helping identify bottlenecks.
Customization
Changing the system language or forcing RTL layout direction assists in multilingual app testing. Staying awake while charging keeps the screen on for convenient monitoring during development.
Potential Risks of Using Developer Options
While Developer Options offer valuable tools for advanced users and developers, enabling and modifying these settings can pose certain risks to the average user. It’s crucial to understand these potential downsides before making changes.
Reduced Security: Weakening security settings, such as disabling USB debugging verification or enabling mock locations, can make your device vulnerable to malicious attacks or unauthorized access.
Data Loss: Options like enabling USB debugging or changing file system permissions can unintentionally lead to data loss if not handled carefully. Inappropriate changes can corrupt data or make it accessible to malware.
Device Instability: Modifying animation scales, background processes, or forcing GPU rendering can lead to app crashes, system instability, and battery drain. Experimenting with these settings without understanding their implications can negatively impact device performance.
Voided Warranty: In certain cases, making substantial changes through Developer Options, particularly those involving rooting or unlocking the bootloader, can void your device’s warranty. It’s crucial to check your manufacturer’s policy before proceeding with such modifications.
Essential Developer Options for Everyday Users
While many Developer Options cater to app developers, several can enhance the average user’s experience. These options offer practical tweaks to improve daily phone usage.
USB Debugging
This crucial option enables connection to a computer for various tasks like file transfer and app installation. Ensure you understand the security implications before activating it.
Stay Awake
Keeps the screen on while charging, useful for presentations or following recipes. Remember to disable it when not needed to prevent screen burn-in.
Window & Transition Animation Scale
Adjusting these scales speeds up or slows down animations, creating a more responsive or visually appealing experience. Set them to off for maximum speed.
Advanced Developer Options for App Developers
Beyond the basic settings, several advanced Developer Options cater specifically to app developers. These options provide granular control over app behavior and system resources, facilitating debugging and optimization.
Debugging and Profiling
Enable USB Debugging: Essential for connecting your device to a computer for debugging and testing applications. Select debug app allows choosing a specific app for debugging. Wait for debugger pauses app launch until a debugger is attached, useful for identifying issues at startup. Show touches visually displays touch input, aiding UI responsiveness checks. Pointer location reveals precise touch coordinates.
Performance Tuning
GPU rendering profile visualizes rendering performance, useful for identifying bottlenecks. Hardware accelerated rendering utilizes the GPU for UI rendering. Force GPU rendering forces apps to use the GPU, even if not optimized, potentially exposing rendering issues. Show GPU view updates highlights areas of the screen being redrawn by the GPU. Don’t keep activities destroys activities immediately after they’re stopped, freeing up memory but potentially impacting user experience.
Troubleshooting Developer Options Issues
Occasionally, enabling or using Developer Options can lead to unexpected behavior. This section addresses common issues and their solutions.
General Troubleshooting Steps
If you encounter problems after enabling Developer Options, try these general steps:
- Restart your device: This often resolves temporary glitches.
- Verify settings: Double-check the specific Developer Option you’ve enabled to ensure it’s configured correctly.
- Disable recently enabled options: If the issue arose after activating a specific option, try disabling it to see if the problem resolves.
Specific Issues and Solutions
Problem: Reduced performance or battery drain.
Solution: Certain Developer Options, like animations scaling or background process limits, can impact performance. Adjust these settings or revert them to their default values.
Problem: App malfunctions.
Solution: Some apps may not function correctly with certain Developer Options enabled. Try disabling options like “USB debugging” or “Verify apps over USB” if you experience app crashes or instability.
Disabling Developer Options
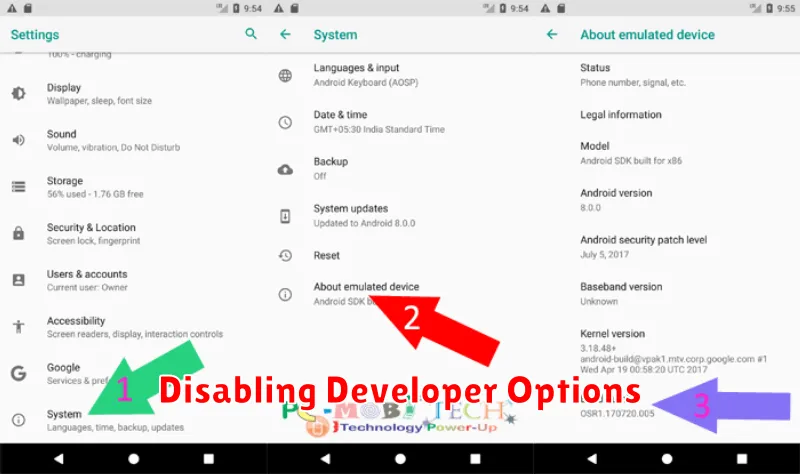
If you no longer need access to the Developer Options, disabling them is a straightforward process. This can help simplify your settings menu and prevent accidental changes to crucial system behaviors.
On most Android devices, the process is similar. Navigate to your device’s Settings. Typically, you can find this by swiping down from the top of the screen to access the quick settings panel, then tapping on the gear icon.
Within the Settings menu, locate the System section. The exact name of this section might vary slightly depending on your device’s manufacturer and Android version (e.g., “System,” “System & updates,” “About phone”). Tap on this section.
Look for the Developer options entry. It may be listed directly within the System section or nested within another submenu, like “Advanced.” Tap on Developer options.
At the very top of the Developer options screen, you’ll find a toggle switch labeled On or Off. Simply tap the toggle to switch it to the Off position. This action will disable the Developer options, and they will be removed from the main Settings menu.